개요
- 프론트에서도 입력값에 대한 검증을 하기 위해 vee-validate와 yup을 사용했습니다.
- vee-validate는 vue.js에서 form validation을 편하게 해주는 도구입니다.
- yup은 유효성 검사를 위한 스키마 빌더입니다.
- vuetify가 기본으로 제공하는 rules로도 유효성 검사를 할 수 있지만 일일히 rules를 만들기 복잡하고 관리하기 어렵기 때문에 vee-validate와 yup을 통해 유효성 검사를 간편하게 해보겠습니다.
- 기본적인 사용법과 vuetify랑 같이 사용하는 방법을 알아보겠습니다.
환경
"devDependencies": {
    "nuxt": "^3.0.0-rc.6"
  },
"dependencies": {
  "@mdi/font": "^6.9.96",
  "axios": "^0.27.2",
  "nuxi": "^3.0.0-rc.6",
  "sass": "^1.53.0",
  "vee-validate": "^4.6.4",
  "vuetify": "^3.0.0-beta.7",
  "yup": "^0.32.11"
}
vee-validate & yup 설치
yarn add vee-validate
yarn add yup
- v4 이상의 vee-validate를 의존성 추가 해줍니다.
사용할 UI
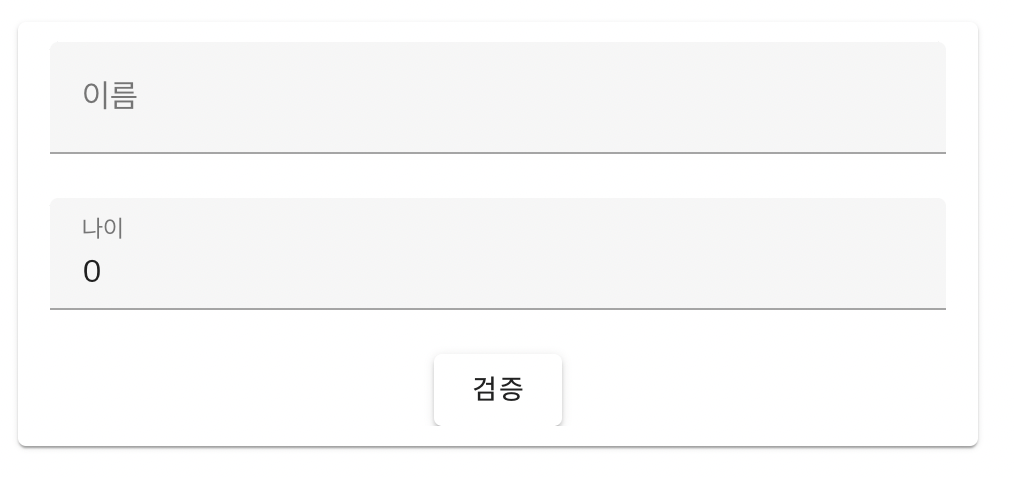
<template>
  <v-container align="center">
    <v-card max-width="480px">
      <v-card-item>
        <v-form>
          <v-text-field v-model="name" label="이름"></v-text-field>
          <v-text-field v-model="age" label="나이"></v-text-field>
          <v-btn type="submit">검증</v-btn>
        </v-form>
      </v-card-item>
    </v-card>
  </v-container>
</template>

<script setup lang="ts">
const name = ref("");
const age = ref(0);
</script>
vee-validation & yup 사용
- vee-validate에는 컴포넌트 방식과 컴포지션 API 방식 두가지 방법으로 유효성 검증을 할 수 있습니다.
- 그 중 Form과 Field를 이용한 컴포넌트 방식을 이용하여 유효성 검증을 해보겠습니다.
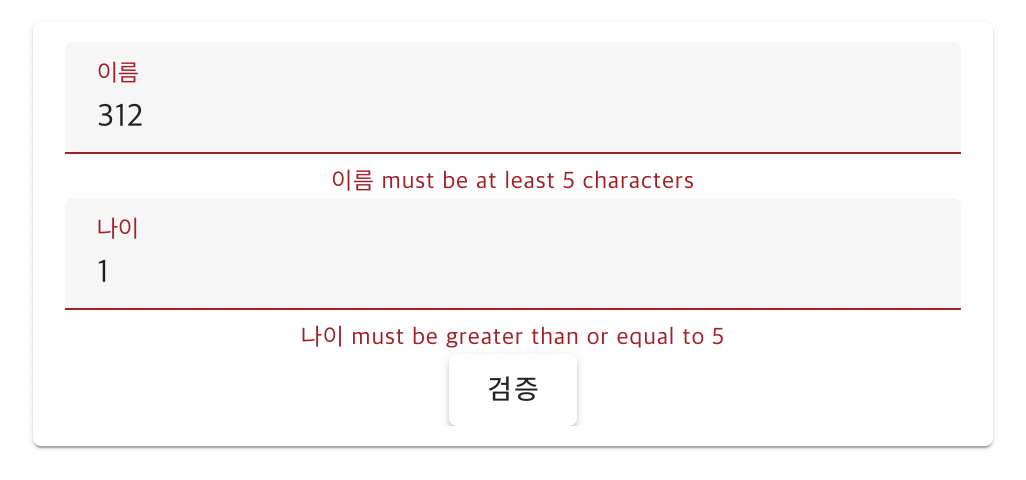
<template>
  <v-container align="center">
    <v-card max-width="480px">
      <v-card-item>
        <Form as="v-form" :validation-schema="schema" @submit="onSubmit">
          <Field name="name" type="text" v-slot="{ handleChange, errors }">
            <v-text-field
              v-model="name"
              @update:modelValue="handleChange"
              label="이름"
              :error-messages="errors"
            />
          </Field>
          <Field name="age" type="number" v-slot="{ handleChange, errors }">
            <v-text-field
              type="number"
              v-model="age"
              @update:modelValue="handleChange"
              label="나이"
              :error-messages="errors"
            />
          </Field>
          <v-btn type="submit">검증</v-btn>
        </Form>
      </v-card-item>
    </v-card>
  </v-container>
</template>

<script setup lang="ts">
import { Form, Field } from "vee-validate";
import * as yup from "yup";

const name = ref("");
const age = ref(0);

const schema = yup.object({
  name: yup.string().required().label("이름").min(5),
  age: yup.number().required().label("나이").min(5),
});

const onSubmit = () => {
  console.log("hello");
};
</script>
- Form에는 yup으로 생성한 오브젝트 스키마에 대한 값이 들어가야합니다.
- Field 컴포넌트를 이용하여 위와 같이 유효성 검증을 할 수 있습니다.
- name에는 yup으로 생성한 오브젝트 스키마의 필드명이 들어가야 합니다.
유효성 검증을 위한 컴포넌트 추가
- Field 컴포넌트를 이용하여 하나씩 설정을 하기에는 반복되는 부분도 많고 복잡하기 때문에 검증을 위한 컴포넌트를 작성하여 사용해보겠습니다.
- nuxt의 경우 components 폴더 아래 Vue 컴포넌트를 작성한다면 다른 페이지에서 import 하지 않고 사용할 수 있습니다.
// /components/TextFieldWithValidation.vue
<template>
  <v-text-field
    v-model="value"
    @blur="handleBlur"
    :label="label"
    :error-messages="errors"
    :type="type"
  />
</template>

<script setup>
import { defineProps, toRef } from "vue";
import { useField } from "vee-validate";

const props = defineProps({
  name: {
    type: String,
    requird: true,
  },
  type: {
    type: String,
    requird: true,
  },
  label: {
    type: String,
    required: true,
  },
});

const { value, handleBlur, errors } = useField(toRef(props, "name"), undefined);
</script>
- components 폴더 아래 유효성 검증을 위한 컴포넌트를 작성해줍니다.
<Form as="v-form" :validation-schema="schema" @submit="onSubmit">
  <TextFieldWithValidation
      v-model="name"
      name="name"
      label="이름"
    />
  <TextFieldWithValidation
      v-model="age"
      type="number"
      name="age"
      label="나이"
    />
  <v-btn type="submit">검증</v-btn>
</Form>
- Form에 대한 코드를 이전보다 간소하게 작성할 수 있습니다.
- 컴포넌트의 name에는 yup.object로 생성한 스키마의 필드명이 들어가야합니다.
에러 메시지 언어 설정
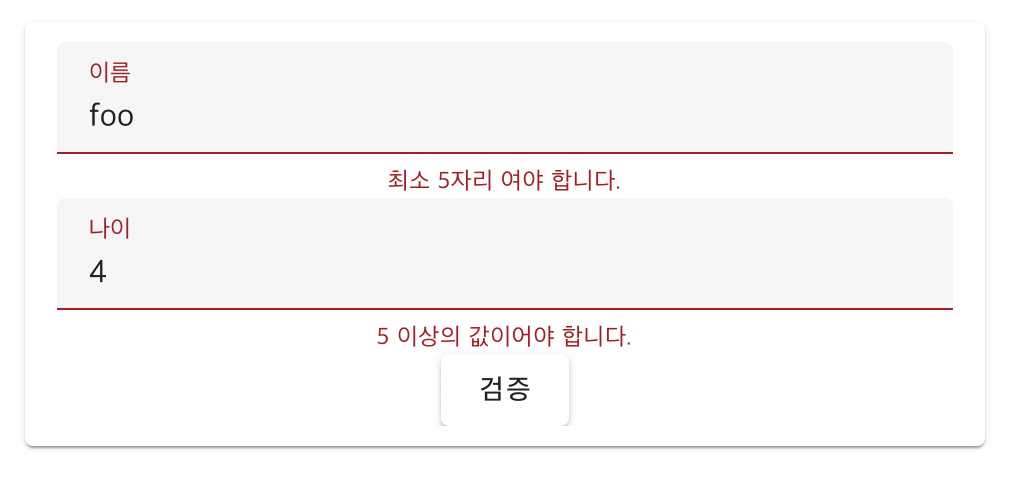
- yup.object를 이용하여 개별 설정도 할 수 있지만 컴포넌트가 많다면 setLocale을 이용하여 스키마 타입에 따라 설정할 수 있습니다.
- 설정 파일의 경우 nuxt의 plugins 폴더 아래 위치하면 자동으로 등록됩니다.
// /plugins/yup.ts
import { setLocale } from "yup";

export default defineNuxtPlugin((nuxtApp) => {
  setLocale({
    string: {
      min: "최소 ${min}자리 여야 합니다.",
    },
    number: {
      min: "${min} 이상의 값이어야 합니다.",
    },
    mixed: {
      required: "필수 값입니다.",
      notType: "타입을 확인해주세요.",
    },
  });
});
참고 자료


